Time is the currency of professional photography. With years of shooting across multiple genres, I’ve discovered that the post-shoot cull is the make-or-break factor between meeting deadlines and falling behind. This crucial process isn’t just about sorting images – it’s about swift, decisive action that transforms overwhelming image volumes into streamlined, client-ready collections.
The post-shoot cull demands both efficiency and artistry. Whether you’re processing thousands of event photos or selecting the perfect frames from an intimate portrait session, this critical workflow step separates exceptional images from the ordinary. More than just freeing up storage space, the post-shoot cull is where we apply our artistic judgment at speed, ensuring quality control while meeting tight delivery deadlines.
This guide is designed for photographers at all levels who want to revolutionize their post-production efficiency. By mastering an aggressive post-shoot cull approach, you’ll not only save hours of editing time but also significantly reduce post-processing fatigue. I’ll share insights about industry-standard tools, lesser-known applications, and even cutting-edge solutions that many haven’t discovered yet – each offering unique advantages for different workflows and budgets.
This process will transform how you:
- Cut culling time in half while improving selection quality
- Make confident, decisive selections at speed
- Deliver exceptional results to clients faster
- Maintain energy for creative editing
Let’s dive into the key steps of effective culling and take your photography, whether it’s event, wedding, or any other genre, to new heights.
Why I’m Obsessed with Post-Shoot Culling
The post-shoot cull isn’t just another checkbox in my workflow – it’s become the cornerstone of my photography practice. With today’s high-resolution cameras producing files upwards of 50MB each, maintaining an efficient image library isn’t optional.
Consider this: a typical wedding shoot can generate 100GB or more of data. Without aggressive culling, you’re not just cluttering your storage; you’re burying your best work under layers of redundant or subpar images.
Over two decades of shooting, I’ve learned that my approach to culling has shaped my work more profoundly than any camera upgrade. It’s transformed how I evaluate images in real-time, enhanced my shooting efficiency, and dramatically improved my final output. When you’re ruthless about only keeping your absolute best work, every aspect of your photography improves – from composition to client delivery.
This “aggressive” culling mindset isn’t just about freeing up terabytes of storage space, though that’s a significant benefit. It’s about maintaining a portfolio where every image serves a purpose, tells a story, or showcases your unique vision. By eliminating duplicates, near-misses, and technically flawed images, you’re not just saving storage costs – you’re investing in your growth as a photographer.

The impact is profound: your portfolio becomes stronger and more cohesive, your editing process more efficient, and your artistic voice clearer. You’ll find yourself becoming more deliberate during shoots, anticipating moments better, and capturing them more effectively. Most importantly, you’ll deliver better results to your clients while spending less time managing your image library.
For photographers at any stage of their journey, embracing the post-shoot cull is transformative. It’s not about ruthlessly deleting photos – it’s about thoughtfully curating a collection that truly represents your vision while maintaining a lean, efficient workflow. Whether you’re managing a growing studio or building your first portfolio, effective culling is the foundation of professional image management.
Essential Tools for the Post-Shoot Cull
The success of your post-shoot cull relies heavily on choosing the right tools for your workflow. After years of refining my culling process, I’ve assembled a toolkit that dramatically speeds up the critical post-shoot cull phase while maintaining consistent quality.

Core Software for Efficient Post-Shoot Culling
Photo Mechanic: This powerhouse drives my initial post-shoot cull with unmatched speed. Its lightning-fast RAW file rendering and intuitive interface have made it my go-to culling software for years. For high-volume shooters, the efficiency gain during culling is remarkable.
Adobe Lightroom/Lightroom Classic: Following the primary cull, Lightroom becomes my refinement center. While some photographers use it as their primary culling tool, I prefer it for organizing and enhancing my pre-culled selections. Its robust feature set supports both culling and editing workflows effectively.
Adobe Photoshop: Essential for post-cull refinements, Photoshop handles the detailed retouching phase. This is where culled images receive their final artistic enhancements.
Capture One (C1): Though Lightroom is my main tool, Capture One Pro excels in specific culling scenarios, particularly during commercial shoots. Its superior tethering capabilities and precise color tools make it invaluable for on-set culling and client collaboration.
Accelerating Cull: The TourBox Advantage
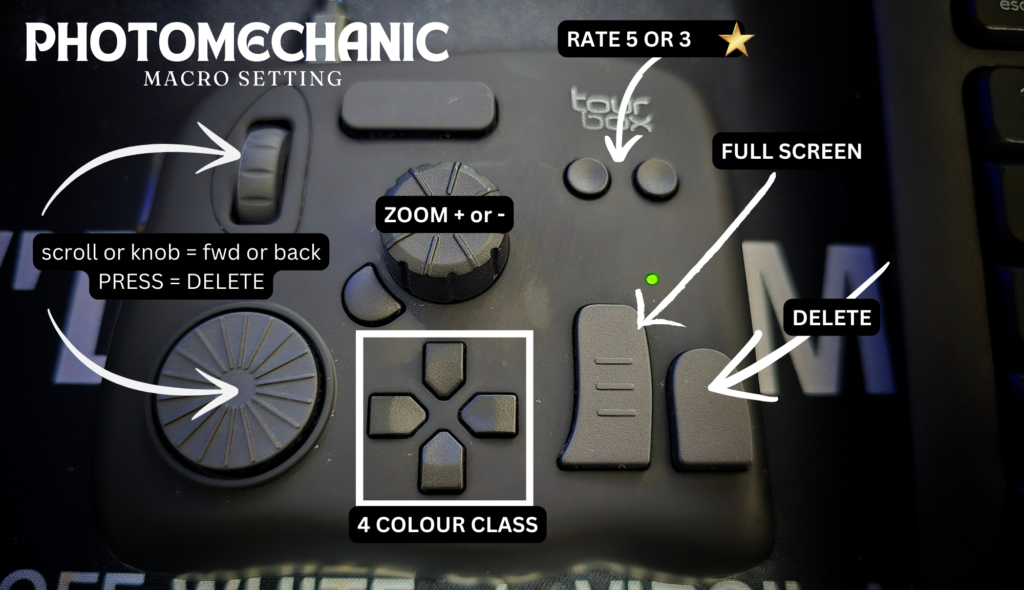
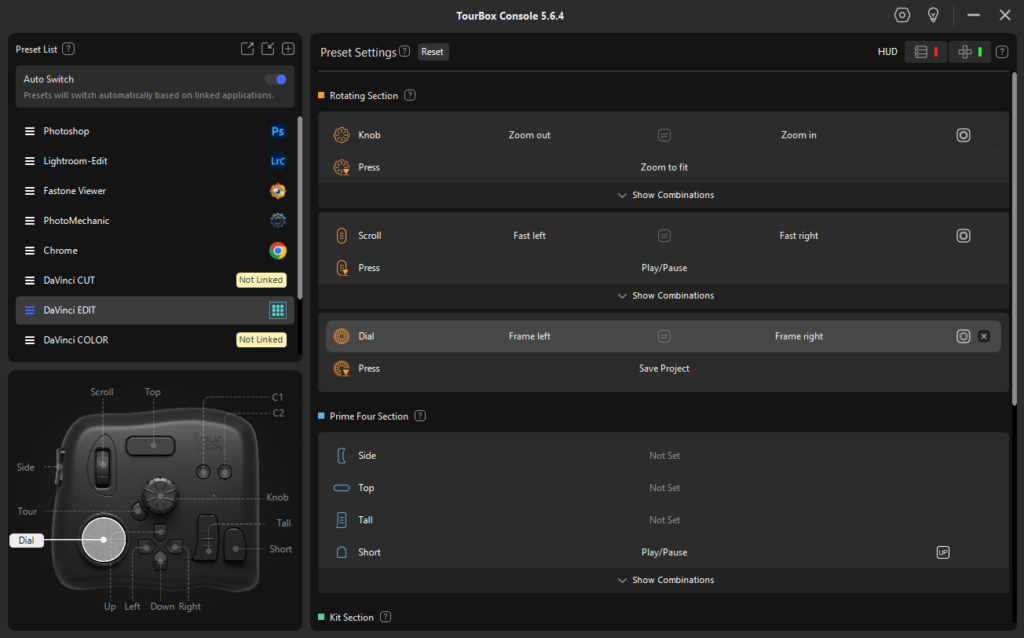
To further streamline the post-shoot cull process, I’ve incorporated the TourBox controller into my workflow. While several options exist (including Loupedeck and Palette Gear), the TourBox has revolutionized my culling efficiency. Here’s how:
- Optimized Culling Speed: A brief 20-minute setup in Photo Mechanic transformed my post-shoot cull workflow. The custom configuration enables rapid image assessment and rating without hand repositioning.
- Seamless Software Integration: The TourBox enhances every stage of the culling process across:
- Photo Mechanic for initial high-speed culling
- Lightroom for refined selection and processing
- Photoshop for detailed post-cull enhancements
- Reduced Culling Fatigue: The intuitive layout minimizes physical strain during extensive culling sessions. Eyes remain on images while hands naturally find controls.
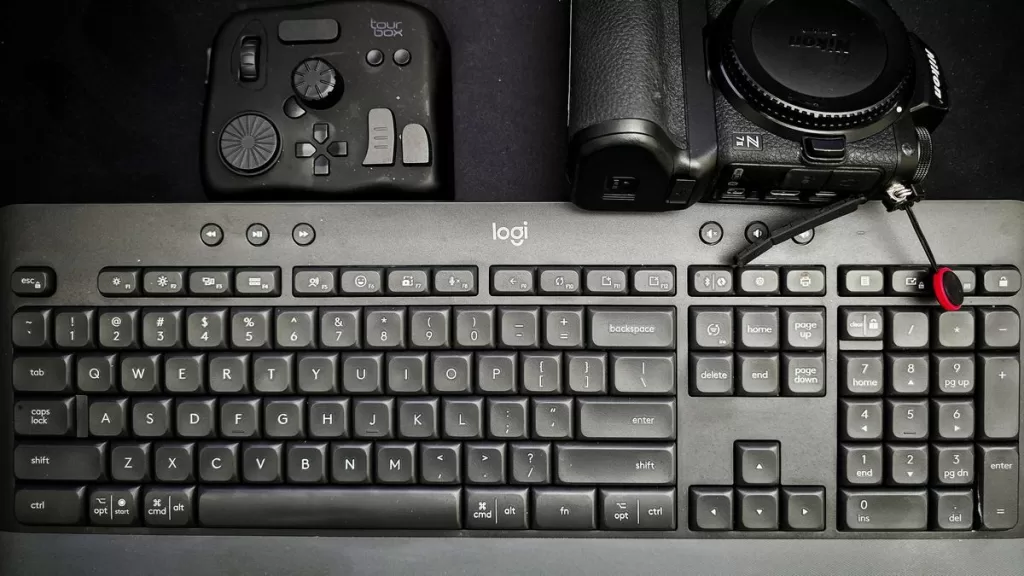
While not essential for an effective post-shoot cull, a controller like the TourBox can significantly accelerate your workflow, especially when handling large image volumes. The efficiency gains make it a worthwhile investment for photographers serious about optimizing their culling process.
1. The Post-Shoot Cull Process
My post-shoot cull revolves around Photo Mechanic, and there’s a good reason for this choice. Its speed and efficiency are unmatched, especially when dealing with large volumes of RAW files. I’ve developed a two-pass approach that, combined with strategic rating and metadata management, consistently delivers results across all my photography genres.
First Pass: Quick Decisions Matter
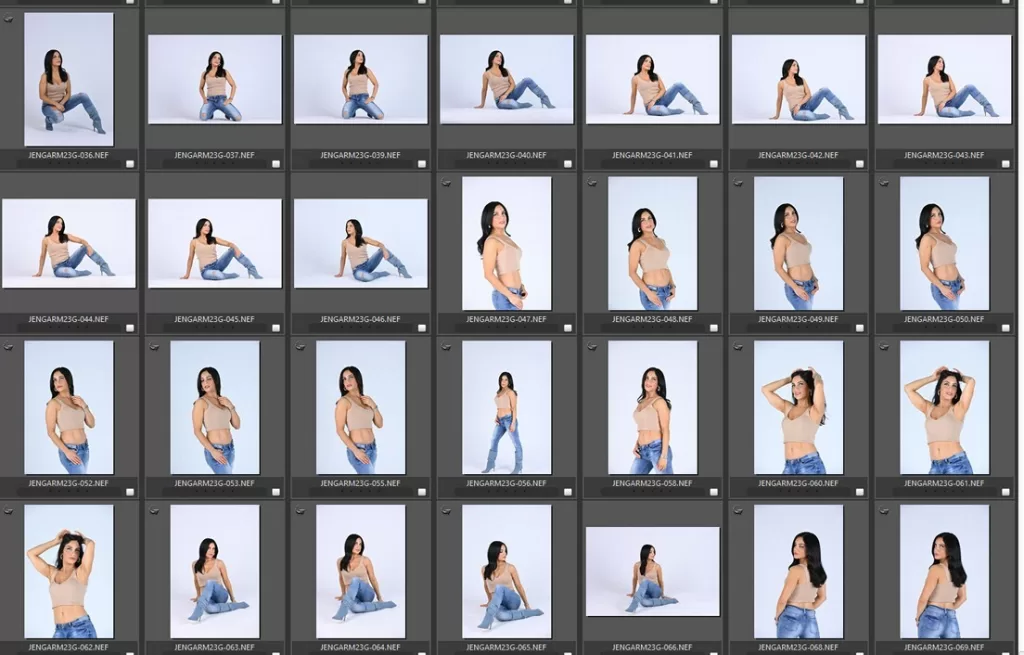
Let me walk you through my process. The first pass is all about quick, decisive action. I rely on Photo Mechanic’s lightning-fast rendering to move through images rapidly. This is where instinct meets efficiency – if an image doesn’t immediately grab me, it gets marked for deletion with a quick tap of the X key.
For the keepers, I use a straightforward rating system:
- 3 stars for solid shots
- 4 stars for exceptional images
- 5 stars for those absolute standouts that I know will be portfolio pieces
I also use color tags to categorize images – red for client selects, blue for my personal favorites. This aggressive first pass typically cuts my collection in half, eliminating technical flaws, poor compositions, and uninspiring shots.
Second Pass: Detailed Review
The second pass is where the real refinement happens. I actually work backwards through my selections, which gives me a fresh perspective on the images. Using my dual-monitor setup, I zoom to 1/2 on the second screen for detailed inspection. This is where I scrutinize critical areas – sharp focus on eyes in portraits, key details in products, crucial moments in event shots.
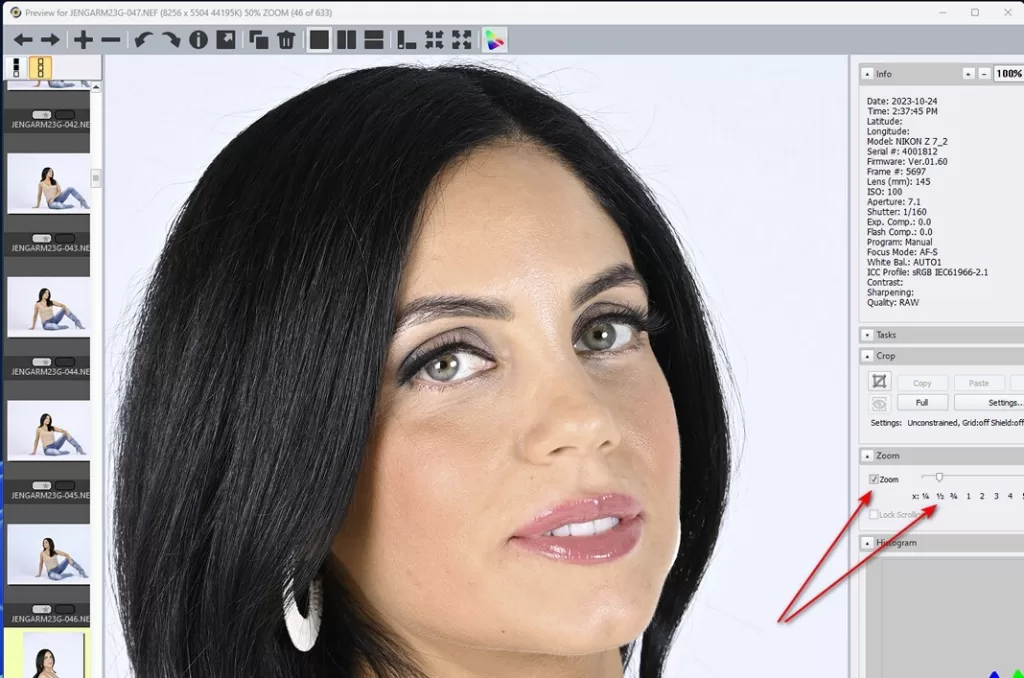
I’m also comparing similar images side by side, ensuring only the strongest version makes the cut. Sometimes this means upgrading a 3-star to a 4-star when I spot exceptional details, or occasionally demoting an image if I notice issues I missed first time around.
Advanced Organization: Metadata and Keywording
By the time I’m ready to move into Lightroom, Capture One, or another editing platform, each image carries a rich set of metadata. This comprehensive approach doesn’t just make images easier to find – it protects our work in today’s digital landscape, streamlines client delivery, and creates a professional, well-organized archive that grows more valuable with time.
After the culling phase, I dive into Photo Mechanic’s powerful metadata capabilities. This stage transforms a well-culled collection into a professionally organized, searchable image library. The process might seem time-consuming, but the long-term benefits are invaluable.
I start with batch metadata application, ensuring every image carries essential information. This includes copyright details, location data, and basic event information. Think of it as creating a foundation for your image library – every photograph needs these fundamental details.
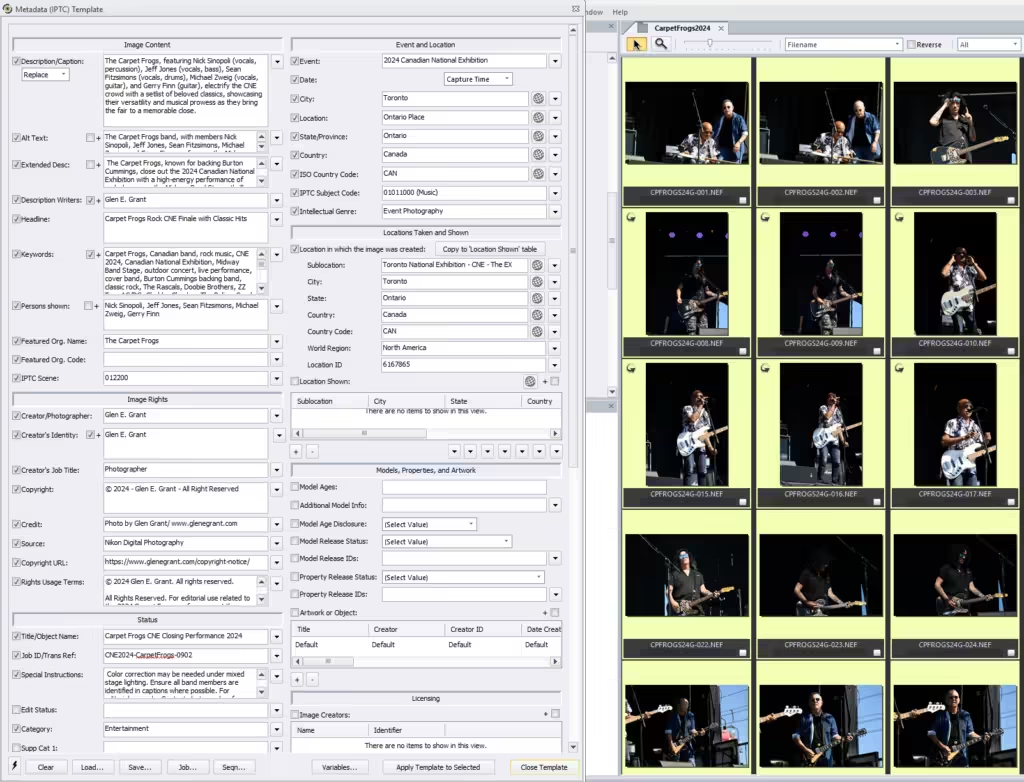
For key images that deserve special attention, I add individual descriptions and specific notes. These might include particular editing requirements, client preferences, or unique aspects of the shot that need to be remembered. This detailed documentation proves incredibly helpful during the editing phase and for future reference.
Photo Mechanic’s hierarchical keywording system is where the magic happens. I begin with broad subject categories – whether it’s a portrait session, landscape shoot, or corporate event. Then I layer in more specific details: the shooting environment, technical aspects like lens choice, and even emotional qualities captured in the image. This structured approach ensures no important detail goes untagged.
The code replacement feature in Photo Mechanic streamlines this process considerably. I’ve developed keyword sets for common scenarios, making it quick to apply comprehensive tags to similar images. This systematic approach maintains consistency across my entire library while saving valuable time.
Recently, I’ve been exploring AI assisted keywording to enhance this process further. Large Language Models (LLMs) can suggest comprehensive keyword sets that might not immediately come to mind. If you’re interested in this cutting-edge approach, check out my detailed guide: “Effective Keywords Prompt: Unleashing the Power of AI for Photo Tagging.” It’s fascinating how AI can enhance our traditional workflows while ensuring our rights as photographers are protected.
Tips for Culling Photos Faster:
- Use keyboard shortcuts to speed up the process
- Set up a consistent rating system (e.g., 3-5 stars for potential keepers)
- Use color labels to categorize images (e.g., red for client selects, blue for personal favorites)
- Take advantage of Photo Mechanic’s compare view to quickly decide between similar shots
Throughout this entire process, I use a systematic approach to grading and color-coding. Ratings from three to five stars help me categorize images based on their potential and immediate impact. Images marked with additional color tags are those that demand a second look, often due to their unique qualities or because they perfectly encapsulate the essence of the shoot.
Alongside this, I infuse metadata to each image, adding layers of context – be it location, subject, or the story behind the shot. This not only aids in organization but also embeds a narrative into my digital library, turning it into a well-curated collection of stories and experiences.
Option 2: Continuing the Cull in Lightroom Classic
If you’ve already done an initial cull in Photo Mechanic, you can seamlessly continue the process in Lightroom:
- Import Your Images: When importing your photos into Lightroom, make sure to check “Preserve File Name” in the File Handling panel. This ensures that any ratings or color labels applied in Photo Mechanic are carried over.
- Review Existing Ratings: In the Library module, use the Grid view (G) to see all your imported images. Your star ratings and color labels from Photo Mechanic should be visible.
- Refine Your Selection: Use Lightroom’s tools to further refine your selection:
- Use the ‘P’ key to flag picks or ‘X’ for rejects.
- Adjust star ratings if needed using number keys 1-5.
- Use color labels to categorize images further.
- Filter View: Use filters to show only flagged photos or photos with certain star ratings to focus on your pre-selected images.
- Compare View: Use the Compare view (C) to directly compare two images side by side, helping you make final decisions among your top picks.
- Zoom to Check Details: Use the zoom tool to check for focus and fine details, especially for images you’re unsure about.
- Delete Rejects: Once you’ve completed your refined cull, filter to show only the rejected photos (X flag) and delete them. Go to Photo > Delete Rejected Photos.
Option 3: Finalizing the Cull in Capture One Pro
If you’re moving from Photo Mechanic to Capture One, here’s how to continue your culling process:
- Import with Metadata: When importing into Capture One, ensure that “Ignore file extensions when sorting” is unchecked in the import dialog. This preserves the ratings and color tags from Photo Mechanic.
- Review Existing Selections: In the Browser view, you’ll see your existing star ratings and color tags from Photo Mechanic.
- Refine Your Selection: Use Capture One’s tools to further refine your cull:
- Adjust star ratings if needed using number keys 1-5.
- Use color tags (1-7) for additional categorization.
- Create albums or smart albums based on your existing ratings for easier management.
- Focus Checking: Use the Focus tool to verify critical sharpness on your top-rated images.
- Compare View: Use the Compare variant mode to make final decisions between similarly rated images.
- Session Folders: If using a session, move your final selections to the Selects folder for a clear separation of your culled images.
- Delete Rejects: Once you’re satisfied with your refined selection, filter for low-rated images and delete them if desired.
Tips for Continuing Your Cull Across Platforms
- Maintain Consistency: Try to use the same rating system across all platforms for seamless transitions.
- Verify Metadata Transfer: Always double-check that your ratings and labels have transferred correctly when moving between software.
- Incremental Culling: Use each stage of your workflow to incrementally refine your selection, getting more critical as you progress.
- Leverage Software Strengths: Use the unique strengths of each software – Photo Mechanic for speed, Lightroom for organization, Capture One for color assessment – to make the most informed decisions.
- Back Up Before Deleting: Before deleting any rejects in your final culling stage, ensure you have a backup of your original files.
By effectively transitioning your culling process across different software, you ensure a thorough and consistent selection process, resulting in a final set of images that truly represents your best work.
Remember, the goal of culling isn’t just to reduce the number of images, but to elevate the overall quality of your body of work. It’s a critical skill that separates professional-grade photography from amateur snapshots.
Final Touches in Photoshop

Once the streamlined selection from Lightroom or Capture One is ready, you can move to Photoshop for the final leg of the post-shoot process:
- Advanced Retouching: Photoshop’s advanced toolset allows for a level of precision and creativity that is unparalleled. Here, you can delve into intricate retouching, composite work, or add those subtle enhancements that elevate a good image to a great one.
- Creative Enhancements: This stage is where you can add your signature touch, infusing each image with a piece of your artistic identity such as any color grading, black and white conversions, etc.
- Final Review: Before exporting, take one last look at each image, ensuring it meets your standards for quality and aligns with your unique aesthetic. You can then save back to Lightroom or Capture One to finalize and export.
Alternatively, you may prefer to do the final touches entirely within Lightroom or Capture One, leveraging the robust editing capabilities of those tools. The choice ultimately depends on your personal workflow and the specific needs of each image.

The Philosophy Behind the Post-Shoot Cull
In photography, every image tells a story, but not every story needs to be told. This is the guiding philosophy behind the post-shoot cull process. Here’s why it’s crucial:
- Space Management: High-resolution photography produces raw files that can exceed 40MB each, making space a premium commodity. Holding onto unused images wastes valuable storage space and reduces efficiency.
- Portfolio Curation: Your gallery is a curated exhibition of your best work, reflecting your skill and vision without being cluttered by ‘maybes’ and ‘almost’ shots.
- Artistic Growth: Culling is more than deleting files; it shapes the narrative of your artistic identity. Each session is an opportunity for self-reflection and growth, assessing shots for composition, emotional impact, and technical precision.
- Efficiency: Efficient culling is essential for managing resources wisely, ensuring that your time, energy, and storage are invested in images with the greatest potential.
Whether you prefer Photoshop, Capture One, or Lightroom for the final touches, the importance of a well-executed post-shoot cull process remains a fundamental step in your workflow.

Join the Conversation
I’m always eager to hear about other photographers’ experiences and techniques. How do you approach your post-shoot cull? What challenges have you faced, and what victories have you celebrated?
Feel free to reach out and share your thoughts:
- Visit my other website blog for more of my articles and resources
- Join me for a conversation on Threads (META)
Let’s continue to push the boundaries of our art, one carefully curated image at a time. Remember, every great photograph you keep makes your rejected images worthwhile. Happy culling!
Footnote:
- All trademarks and logos are the property of their respective owners and are used for editorial purposes only. No endorsement implied.


