Introduction
Adobe has integrated adjustment presets into Photoshop’s core functionality, adding another valuable tool to the digital photographer’s workflow. This feature brings new capabilities for creating, saving, and managing adjustment layers, offering enhanced control over the editing process.
The introduction of adjustment presets reflects Adobe’s commitment to streamlining the photography workflow. As someone who works with both commercial and editorial projects, I appreciate how this addition addresses real workflow needs while maintaining creative flexibility.
Understanding Adjustment Presets
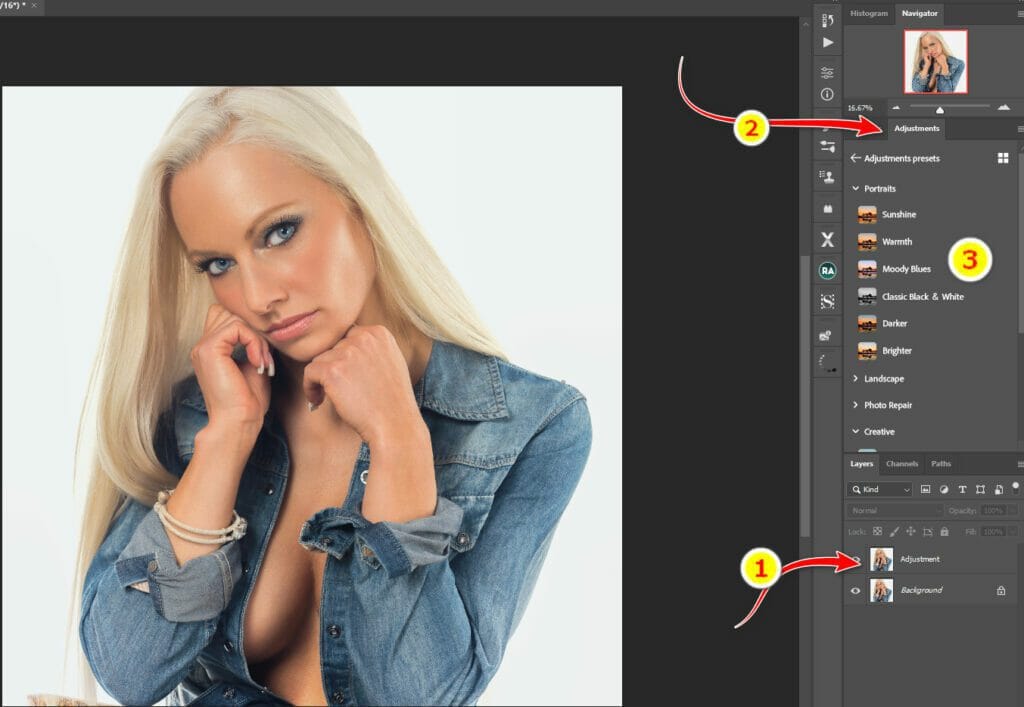
When you open an image in Photoshop and navigate to the Adjustments tab, you’ll discover the adjustment preset feature ready to transform your workflow. As you move your cursor over different preset categories, Photoshop provides a live preview of how each one will affect your image. Applying a preset creates an adjustment layer instantly, preserving your ability to make further refinements. This immediate visual feedback helps you make informed decisions about which adjustments will work best for your specific image.
The presets aren’t just about speed or convenience. They represent carefully crafted combinations of adjustments that can enhance your images in ways that might take considerable time to achieve manually. Each preset category serves a specific purpose, from color correction to creative effects, giving you a broad palette of options to work with.
Creating Your Own Preset
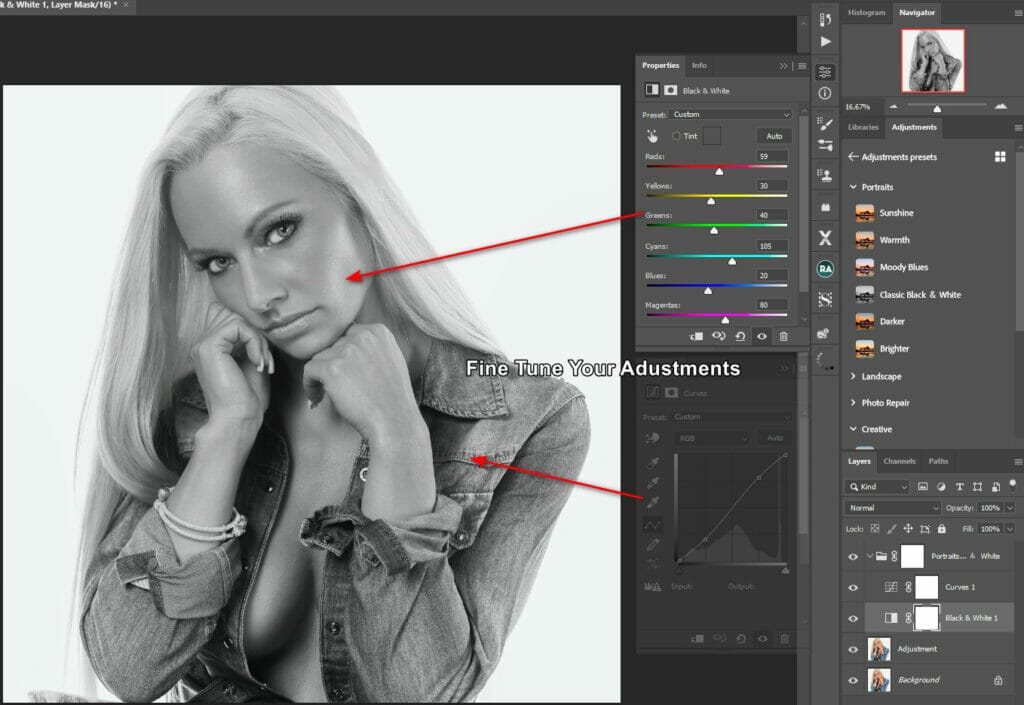
The real value of adjustment presets comes from creating ones tailored to your specific needs. Start by adding a new adjustment layer through the Layer menu. Make your desired adjustments to parameters like hue, saturation, or contrast based on your creative vision. The adjustments you choose will depend entirely on the look you want to achieve.
When creating presets for professional work, consider the various scenarios you encounter regularly. For instance, I often create specific presets for different lighting conditions I frequently work with in studio settings. This includes presets for handling mixed lighting, correcting common color casts, and managing contrast in challenging situations. By analyzing your common adjustment patterns, you can create presets that genuinely streamline your workflow.
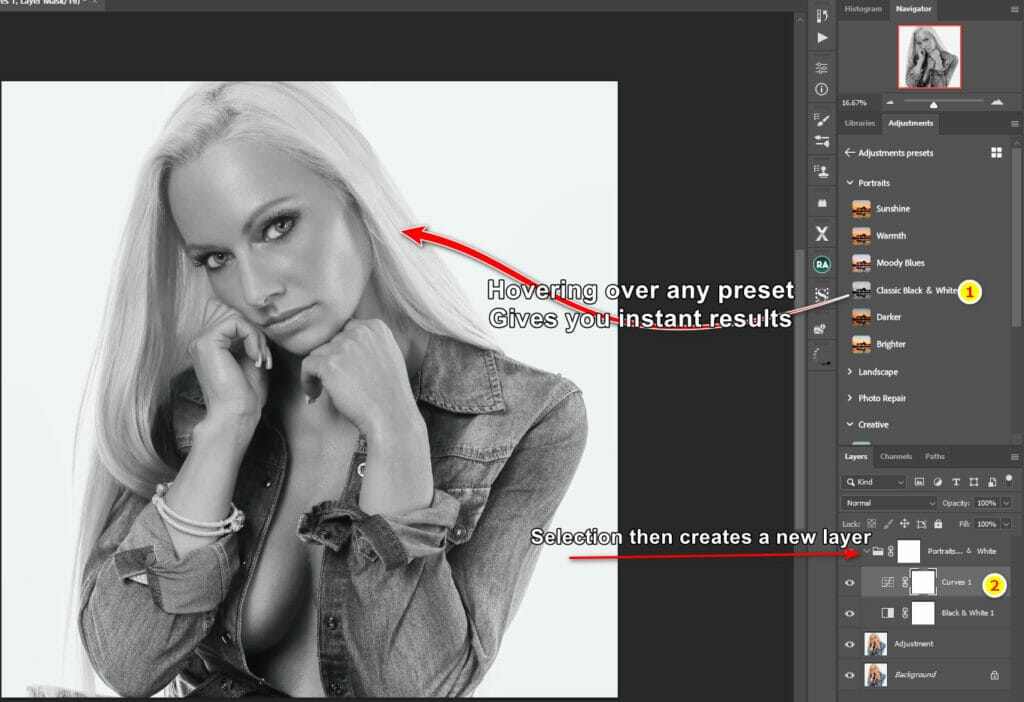
After finalizing your adjustments, you can group this layer with others you’d like to include in your preset. Select the layers you want to combine by holding CTRL (Command on Mac) and clicking each one, then group them together. This grouped set of adjustments becomes your custom preset, ready to apply to other images with a single click.
Saving Your Presets
After you’ve spent time meticulously adjusting and fine-tuning your image to create the perfect look, the next crucial step is to save your custom preset. This allows you to reuse the same adjustments on other images, ensuring consistency and saving time in your editing process. In Photoshop, there are two main methods to save your custom presets:
Method 1: Save as a Color Lookup Table (LUT)
The first method to save your custom presets involves using Color Lookup Tables, commonly referred to as LUTs. This technique is a widely used approach in the world of photo and video editing, and it’s recognized for its versatility and compatibility with various applications.
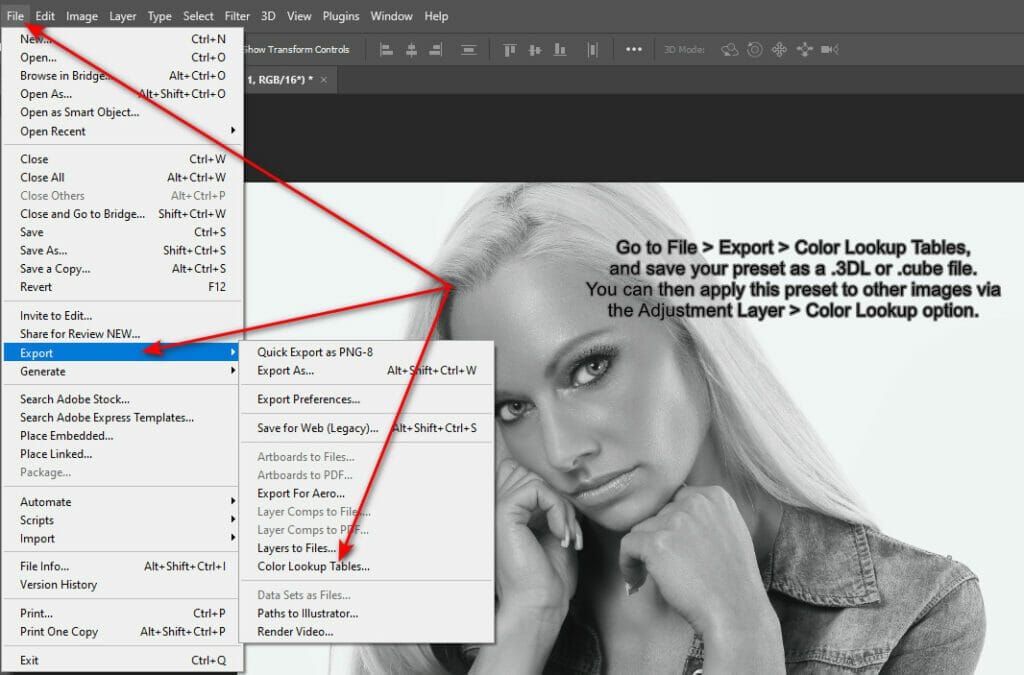
To save your preset as a LUT, you’ll need to navigate through the Photoshop interface. Start by going to the ‘File’ menu, then select ‘Export’, and finally choose ‘Color Lookup Tables’. This will open a dialog box where you can name your preset and choose the format you want to save it in. Photoshop offers two options: .3DL and .cube; both formats are widely used and compatible with most photo and video editing software.
Once you’ve saved your preset as a LUT, applying it to other images is a breeze. Simply go to the Adjustment Layer menu, select the ‘Color Lookup’ option, and choose the LUT you’ve created. Your preset will be instantly applied to your image, transforming its look based on the adjustments you’ve saved in the LUT.
One of the main advantages of this method is its cross-platform compatibility. LUTs created in Photoshop can be used in other applications like Premiere Pro and After Effects. This means you can create a consistent look across different projects, whether you’re editing photos for a digital album or creating visual effects for a video.
However, it’s important to note that this method does have a downside. Once a preset is saved as a LUT, you can’t adjust its parameters individually. This means that the hue, saturation, contrast, and other adjustments you’ve made are set and can’t be tweaked when the LUT is applied to an image.
Method 2: Add to Your Photoshop Library
The second method for saving your custom presets involves a more integrated approach, which is adding your group of adjustments directly to your Photoshop library. This method is particularly useful if you plan to use your custom presets frequently or if you have a collection of presets that you want to keep organized and easily accessible.
To add your group of adjustments to your library, simply select the group and then choose the ‘Add to Library’ option. This will save your group of adjustments as a single entity in your library, making it easy to locate and apply whenever you need it.
One of the standout features of this method is the ease with which you can apply your preset to other images. All it takes is a simple drag-and-drop action from the library onto your image, and voila, your preset is applied. This drag-and-drop feature not only makes the application of presets quick and easy but also allows you to experiment with different presets on your image without having to navigate through multiple menus.
Another significant advantage of this method is that it’s fully editable. Unlike saving your preset as a Color Lookup Table (LUT), adding your preset to your library allows you to tweak and fine-tune your preset even after it’s been saved. This means you can adjust the hue, saturation, contrast, or any other parameter of your preset as needed, giving you the flexibility to adapt your preset to different images or to refine your preset as your editing style evolves.
Working With Multiple Adjustments Presets
Working with multiple adjustment layers becomes simpler with Photoshop’s organization tools. You can collapse all layers for a cleaner view by holding down CTRL (Command on Mac) and clicking the arrow next to your adjustment layers. The eye icon next to each layer lets you toggle presets on and off, making it easy to compare your edited image with the original or to see the effect of individual presets.
Remember that these presets remain fully editable. You can adjust any parameter after applying a preset, giving you complete control over the final look of your image. This flexibility allows you to use presets as starting points while maintaining the ability to fine-tune adjustments for specific images or conditions.
Professional Applications
In commercial photography work, adjustment presets serve several key functions. For product photography, they help maintain consistent color representation and standardized exposure levels. In editorial work, they allow quick adaptation to different publication requirements while maintaining image quality.
The cross-application compatibility proves particularly useful when working on projects that combine still photography with video elements. The ability to use LUTs across different Adobe applications ensures consistent looks across various media types.
Moving Forward
Adobe continues developing and refining the adjustment preset feature, expanding its capabilities within the Creative Cloud ecosystem. The integration with other Adobe applications makes this tool particularly valuable for photographers who work across multiple media types. The feature’s ongoing evolution suggests exciting possibilities for future workflow enhancements.
I encourage you to explore adjustment presets in your own work. They provide a practical foundation for establishing consistent editing processes while maintaining the creative flexibility that professional work demands. Start by creating presets for your most common adjustments, then expand your collection as you identify new opportunities for workflow optimization.
For more on the latest release notes for Photoshop


